

28
Aug
How Smoke Damage Is Removed From Walls: A Step-by-Step Guide
How to Remove Smoke Damage From Walls: Complete Guide
- Acting fast is crucial to prevent smoke damage from setting in and causing permanent stains.
- You must wear protective gear to avoid health risks from soot particles and cleaning fumes.
- Always remove loose soot with a dry cleaning sponge or HEPA vacuum before using a wet cleaning solution.
- A Trisodium Phosphate (TSP) cleaning solution is highly effective for removing tough smoke stains from walls.
- Eliminating the lingering smoke odor is just as important as cleaning the visible stains.
- For widespread damage, professional restoration services offer the safest and most thorough cleanup.
Introduction
After a fire, even a small one, the resulting smoke damage can feel overwhelming. The dark smoke stains on your walls and the persistent odor can make your home feel unfamiliar and unsafe. Cleaning this damage is a big job, and using the wrong methods can sometimes make things worse. This guide is here to help. We’ll walk you through the proper steps for assessment, preparation, and cleaning to help you with your smoke damage restoration project and bring your walls back to their former state. For local help, see fire and smoke restoration.
Assessing Smoke Damage on Walls in Tampa-St Petersburg (Sarasota)
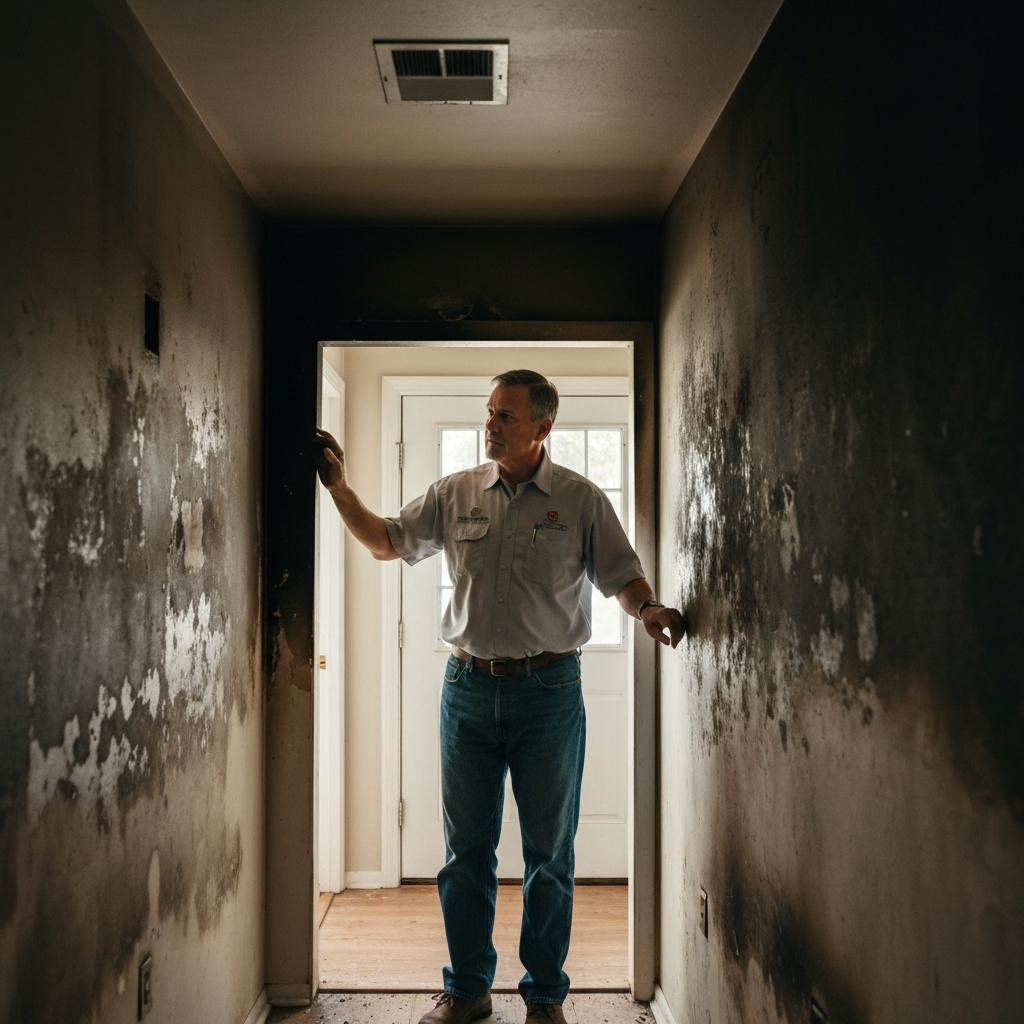
Before you start cleaning, you need to understand the extent of the smoke damage. Carefully inspect all affected areas, looking for visible smoke stains and signs of discoloration. You’ll notice that smoke and soot particles don’t spread evenly. Some walls may be heavily coated, while others have lighter streaks.
Pay close attention to corners and areas near the ceiling, as smoke rises and collects in these spots. Note the color and texture of the residue. Is it a dry, ashy powder or a thick, oily film? This initial assessment will help you choose the right cleaning method for your situation.
Identifying the Types and Severity of Smoke Stains
Not all smoke stains are the same. The type of material that burned determines the kind of smoke residue left behind. For example, burning wood often leaves a dry, powdery soot that is easier to remove. In contrast, burning plastics or synthetic materials creates a thick, oily residue that can be much more stubborn. Knowing the different types of soot is key to cleaning them effectively.
The severity of the damage also plays a big role. Light damage might just be a faint discoloration, while severe damage involves thick layers of soot that have deeply penetrated the wall surface. The longer the smoke residue sits, the more acidic it becomes, leading to permanent staining and damage. Common signs of smoke damage include visible black or brown stains, a strong, unpleasant smell, and a gritty texture on the walls from soot particles.
Understanding these differences is important because they affect your cleaning approach. Dry soot might come off with a dry sponge, but oily soot will require a powerful degreasing cleaner. Properly identifying the type and severity of the stains will save you time and prevent you from accidentally smearing the smoke residue and making the problem worse.
Evaluating Different Wall Surfaces: Painted, Drywall, and Plaster
The type of wall surface in your home will influence how you handle smoke damage cleaning. Painted walls, drywall, and plaster each have different properties and react differently to cleaning agents. For example, a semi-gloss or gloss paint is less porous and generally easier to clean than a flat matte paint, which can absorb stains more readily.
Drywall is a very common material, but it’s also quite porous. If smoke and soot penetrate deep into the drywall, it can be difficult to clean completely, and sometimes the affected sections may need to be replaced. Plaster walls, often found in older homes, are denser and less porous than drywall. This can make them more resilient to smoke damage, but they can still be stained.
There is a difference in cleaning smoke damage from these surfaces. Gentler methods may be needed for delicate paint or wallpaper to avoid causing more harm.
Wall Surface | Porosity | Cleaning Considerations |
|---|---|---|
Painted Walls | Varies | Glossy paints are easier to clean; flat paints absorb stains. |
Drywall | High | Can absorb soot deeply; may require replacement if severe. |
Plaster | Low | More durable and less porous, but can still stain. |
Preparing Your Space for Smoke Damage Removal

Proper preparation is a critical step in the smoke damage removal process. Rushing into cleaning without preparing the area can lead to further damage to your belongings and pose significant health risks to you. Taking the time to set up your workspace correctly ensures a safer and more effective cleanup.
This involves not only gathering your supplies but also protecting yourself and the rest of your home. You’ll need to wear the right protective gear and take steps to contain the soot and prevent it from spreading. Let’s look at the specific safety equipment you should use and how to protect your furniture and flooring.
Safety Equipment and Precautions to Take Before Starting
Your safety should always be the top priority. Soot contains tiny, harmful particles that can cause respiratory irritation and other health risks if inhaled. The cleaning products you use can also produce strong fumes. Because of this, wearing the right protective gear is non-negotiable.
Before you begin, make sure you have the following items:
- Rubber gloves to protect your hands from soot and chemicals.
- Safety goggles to shield your eyes from splashes and airborne particles.
- A face mask or, even better, a respirator to prevent you from inhaling soot and fumes.
Proper ventilation is also essential. Open all windows and doors to create a cross-breeze. Using fans can help circulate the air and push contaminated air outside. You should also turn off your HVAC system to prevent soot particles from spreading throughout your home via the air ducts. Following these precautions will help minimize your exposure to harmful substances.
Steps to Protect Flooring, Furniture, and Personal Items
Part of your preparation involves safeguarding your home from further damage during the cleaning process. Soot can easily be tracked onto carpets, and cleaning solutions can drip onto floors and furniture. Protecting these items before you start will save you from a much bigger cleanup project later.
Start by clearing the room of as much furniture and as many personal items as possible. For larger items that you can’t move, push them to the center of the room and cover them completely with plastic sheets. This creates a clear workspace around the walls.
Next, take steps to protect your flooring.
- Lay down plastic drop cloths or sheets over the entire floor.
- Secure the edges of the cloths to the baseboards with painter’s tape to ensure they don’t shift.
- Consider using a double layer of protection in high-traffic areas. This preparation ensures that when you begin cleaning, you can focus on the walls without worrying about accidentally damaging anything else in the room.
Selecting Effective and Safe Cleaning Methods for Smoke Damage
Once your space is prepped, it’s time to choose your cleaning method. Using the right cleaning solution is essential for effectively removing smoke stains and residue. A simple soap and water mixture often isn’t strong enough and can smear the soot, making the stains worse. You need a product designed to cut through grease and acidic residue.
For many homeowners, a powerful chemical cleaner is the best option. However, there are also eco-friendly alternatives that can work for lighter damage. If the job seems too big or you’re unsure which products to use, calling professional restoration services is always a wise choice. Let’s explore some of the best products and DIY options available.
Choosing the Best Cleaning Products for Smoke Stains on Walls
For tackling tough smoke stains, Trisodium Phosphate (TSP) is widely considered one of the most effective cleaners. It’s a heavy-duty chemical that excels at cutting through the oily, greasy residue that smoke leaves behind. You can find TSP at most hardware stores.
To create a powerful cleaning solution, mix about one tablespoon of TSP into a gallon of warm water. For very stubborn stains, you can adjust the mixture to be slightly stronger. Always remember to wear your protective gear when handling TSP, as it is a strong chemical. Before you apply it to the entire wall, test the TSP solution on a small, inconspicuous area to ensure it doesn’t damage the paint or wall surface.
If TSP is not available, you can look for other heavy-duty degreasers specifically formulated for fire damage restoration. These products are designed to break down soot and lift stains from various surfaces. When in doubt, read the product label to see if it’s suitable for your type of wall.
Eco-Friendly and DIY Alternatives for Smoke Removal
If you prefer to avoid harsh chemicals or are dealing with minor smoke damage, such as from a candle in the bathroom, there are eco-friendly alternatives you can try. These DIY solutions use common household items to help with smoke damage cleaning. While they may not be as powerful as a TSP solution, they can be effective for lighter stains.
One of the most popular natural cleaners is white vinegar. Its acidic nature helps to break down soot and neutralize odors. You can mix equal parts white vinegar and warm water in a spray bottle. Baking soda is another great option, especially for absorbing lingering smells and acting as a gentle abrasive.
Here are a few eco-friendly cleaning tips:
- Create a paste with baking soda and water to gently scrub at stains.
- Spray a vinegar-and-water solution on the walls and wipe with a clean cloth.
- Place bowls of white vinegar or baking soda around the room to help absorb smoke odors from the air. These methods offer a safer, more natural approach to cleaning light smoke damage yourself.
Step-by-Step Process to Clean Smoke Damage from Walls
Now that you have your supplies and have prepared the room, you’re ready to start the smoke damage cleaning. Following a systematic, step-by-step process is the key to achieving the best results and avoiding common mistakes, like smearing the soot. The cleanup process involves more than just scrubbing; it’s a multi-stage restoration effort.
You’ll begin by removing all the loose residue before moving on to deep cleaning with a wet solution. Finally, you’ll address the invisible but equally important problem of lingering odors. Let’s break down each of these critical steps in more detail.
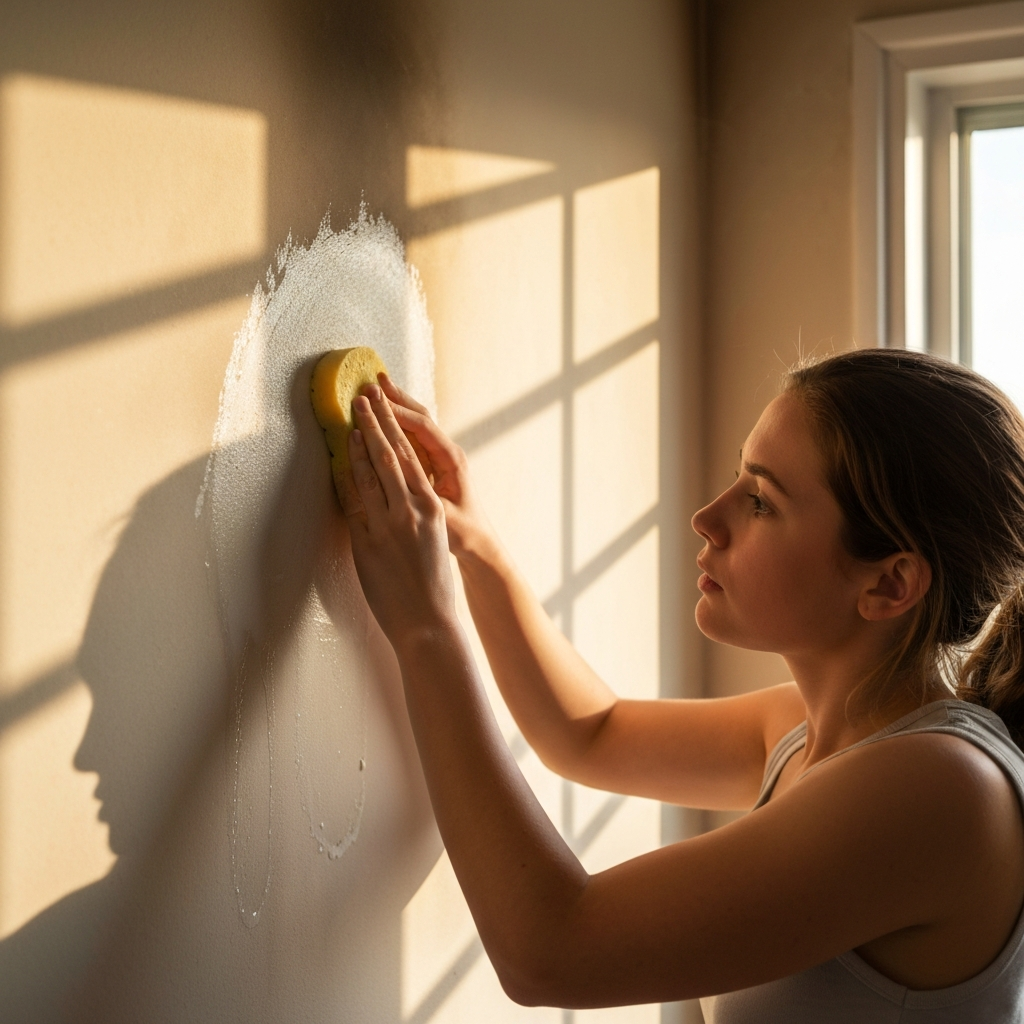
Removing Loose Soot and Residue Before Deep Cleaning
The very first cleaning step is to remove all the loose soot from the walls. It’s crucial that you do this while the walls are still dry. Adding moisture at this stage will turn the soot into a muddy mess that smears and becomes much harder to clean. Professionals always start with dry soot removal during fire restoration.
The best tools for this job are a HEPA vacuum or a chemical dry cleaning sponge. A HEPA vacuum is ideal because its filter can trap the extremely fine soot particles and prevent them from being blown back into the air. If using a vacuum cleaner, use the brush attachment and move gently over the walls.
A dry cleaning sponge, also known as a soot sponge, is another excellent option. These sponges are made from a special rubber that lifts loose soot without scrubbing.
- Start at the top of the wall and work your way down.
- Use straight, parallel strokes.
- As the sponge gets dirty, use a knife to slice off the soiled layer to reveal a clean surface.
- Do not get the sponge wet.
Eliminating Lingering Smoke Odor and Preventing Future Issues
Cleaning the visible stains is only half the battle. Lingering smoke odor can penetrate deep into walls, carpets, and furniture, affecting your home’s air quality for weeks or even months. Getting rid of these persistent smoke odours is essential for a complete restoration and your peace of mind. Start by continuing to ventilate the area—keep windows open and use fans to circulate fresh air.
For stubborn smoke smells, you can place open bowls of white vinegar or baking soda around the room. These natural deodorizers are great at absorbing odors from the air. For more severe cases, an air purifier with a HEPA filter and activated carbon can capture airborne particles and neutralize the smell.
Sometimes, even after thorough cleaning, some stains and odors may remain trapped in the wall material. In these situations, you may need to repaint. Before you do, apply a special stain-blocking, odor-sealing primer like Kilz or Zinsser. This will lock in any remaining stains and smells, preventing them from bleeding through your new coat of paint.
Conclusion
In summary, effectively removing smoke damage from walls involves a thorough understanding of the types and severity of stains, as well as the right cleaning methods to restore your space safely. By preparing your area, employing the right tools, and following a step-by-step cleaning process, you can significantly improve the appearance and air quality of your home. Remember, maintaining a clean environment is not just about aesthetics; it’s also about health and well-being. If you’re feeling overwhelmed or need expert assistance, don’t hesitate to reach out and book a free consultation with our team. We’re here to help you reclaim your space!
Frequently Asked Questions
What are the common signs of smoke damage on walls?
The most common signs include visible yellow or black smoke stains, discoloration of paint, and a fine layer of soot particles on surfaces. You’ll also likely notice a persistent, unpleasant smoke odor. This smoke residue can be either dry and powdery or oily and sticky, depending on what burned.
Can I remove smoke damage from walls myself, or should I hire a professional?
You can clean minor smoke damage yourself if you follow the proper steps and safety precautions. However, for extensive damage covering multiple rooms or if you have health risks like asthma, it’s best to hire professional restoration services. They have the right equipment to ensure the best results.
What materials and tools are needed for removing smoke damage from walls?
You will need protective gear like gloves and goggles, a HEPA vacuum cleaner or a dry cleaning sponge, buckets, and a strong cleaning solution. A solution made with trisodium phosphate (TSP) and warm water is highly effective for breaking down soot and stains on walls.
Are there specific cleaning solutions that are most effective for smoke damage removal?
A TSP solution is one of the most effective cleaners for heavy smoke damage on painted walls. For a more eco-friendly approach to light cleaning, a mixture of white vinegar and water can work well. Baking soda can also be used as a gentle abrasive.
Dealing with fire or smoke damage in Tampa? Contact 911 Restoration of Tampa Bay for professional fire damage restoration services. Call (813) 261-1525 for 24/7 emergency response.
Latest Posts
Contact Us
For Advice
Need help? Talk to an expert
(813) 261-1525